How To Mount A Partition In Ubuntu
If you want to mount a partition in Ubuntu, all you really need to do is plug the drive into your machine and open your file browser. However, what if you want to ensure that partition always mounts on boot?
Well, fear no more intrepid Ubuntu explorer, because I have you covered. This quick and simple guide will show you how to mount a partition in Ubuntu and ensure it’s always mounted automatically on boot.
Step One: Recon
First things first – we need to get some basic information about the partition, like the drive it sits on, before we start configuring the mount point.
Run the following command in terminal to work out which partition/drive is the one you want to mount.
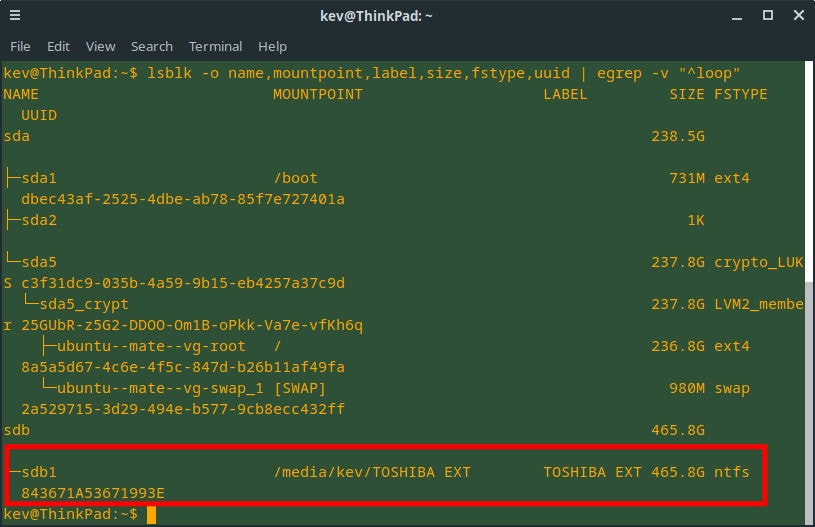
lsblk -o name,mountpoint,label,size,fstype,uuid | egrep -v "^loop"This command will show all the devices and partitions that your user can see on the system. We’re using the egrep command to remove all squashfs partitions that snap packages use. This way the output is much cleaner.
The output should look similar to the image below. I am going to be mounting the NTFS partition that’s on sdb1 (show below in the red box).
Step Two: The Setup
We can see from the output above that the drive I’m trying to mount (in my case a USB HDD) is already mounted at /media/kev/TOSHIBA EXT, but I want to ensure he drive always mounts at /media/backups.
Create the directory that will be used as the mount point for the partition:
sudo mkdir /media/backupsNext, we will edit the fstab file which contains all the mount point configuration for the system.
sudo nano /etc/fstabYou need add a line to the bottom of the fstab file that contains the config for the partition you want to mount. That line should look something like this:
# Mount point for my USB backup drive
UUID="843671A53671993E"  /media/backups  nfts  defaults  0  2
Note the UUID and the part that says ‘ntfs'. The partition I’m trying to mount is NTFS, so I have entered ‘ntfs' to my fstab entry. However, if you’re using a different filesystem, for example EXT4, you would put ‘ext4' here.
The UUID was printed out when we did the recon earlier. It’s the long hexadecimal string. These are different lengths depending on the filesystem type.
Finally, you need to mount the partition at the new location. That’s just a single command:
sudo mount -avIf you run the ‘lsblk' command again, you should now see your partition mounted at the new location. If you don’t, reboot your machine.
Step 3: Set Permissions
You may not have to do this step, but I thought I’d include it just in case. You may find that when you browse your newly mounted partition, that you can’t write anything to it. Let’s fix that.
You will need to take ownership of the partition with the ‘chown' command, then change the permissions with the ‘chmod' command. In this case we will set the permissions to 755.
If you want to learn more about Linux filesystem permissions, this is a great guide.
sudo chown -R user:group /mount/point/path
sudo chmod -R 755 /mount/point/path
Be sure to update the parts of the above commands show in red to suit your system. In most cases, your user and group names will likely be the same. For me, the commands look like this:
sudo chown -R kev:kev /media/backups
sudo chmod -R 755 /media/backups
That’s it!
If you want to mount a partition in Ubuntu, the process really is this simple. Whilst most long-term Linux users will likely know this process like the back of their hand, this can be a very frustrating process for new users.
This process can be useful for all kinds of things, but really comes into its own when you want to permanently reference a partition, like setting up backup routines on a server. I know it helped me when setting up my home server.