How To Create An IndieWeb Profile
| 7 min read
I've written about the IndieWeb in the past, but it can be little complicated and confusing to get started. In this post I'm going to take you through creating an IndieWeb profile.
What is the IndieWeb?
The IndieWeb is a way of connecting your personal website with lot of other peoples' sites from around the world. So if you're on the IndieWeb and I link to your blog in one of my posts, you get a notification. These are called Webmentions and you can see the Webmentions for this post in the comments section below.
Think of it as an inter-linked commenting system that traverses the entire Internet. Websites aren't physically connected, but they can communicate with one another. You can learn more on the IndieWeb site.
What is an IndieWeb profile?
An IndieWeb profile, or h-card as they're officially known, is a snippet of code that tells other websites connected to the IndieWeb a little bit about you and your site.
I like to think of it as my business card for the IndieWeb.
Why do I need an IndieWeb profile?
Well, like any inter-connected social system, a profile help people recognise you within the network. A profile is also useful for discovery purposes on the IndieWeb.
You can create a h-card in a number of ways, but in this post I will show you how I have created my h-card and what it all means.
Example IndieWeb h-card
Let's take a look at my IndieWeb profile first, so you can see what they look like and what we need to configure.
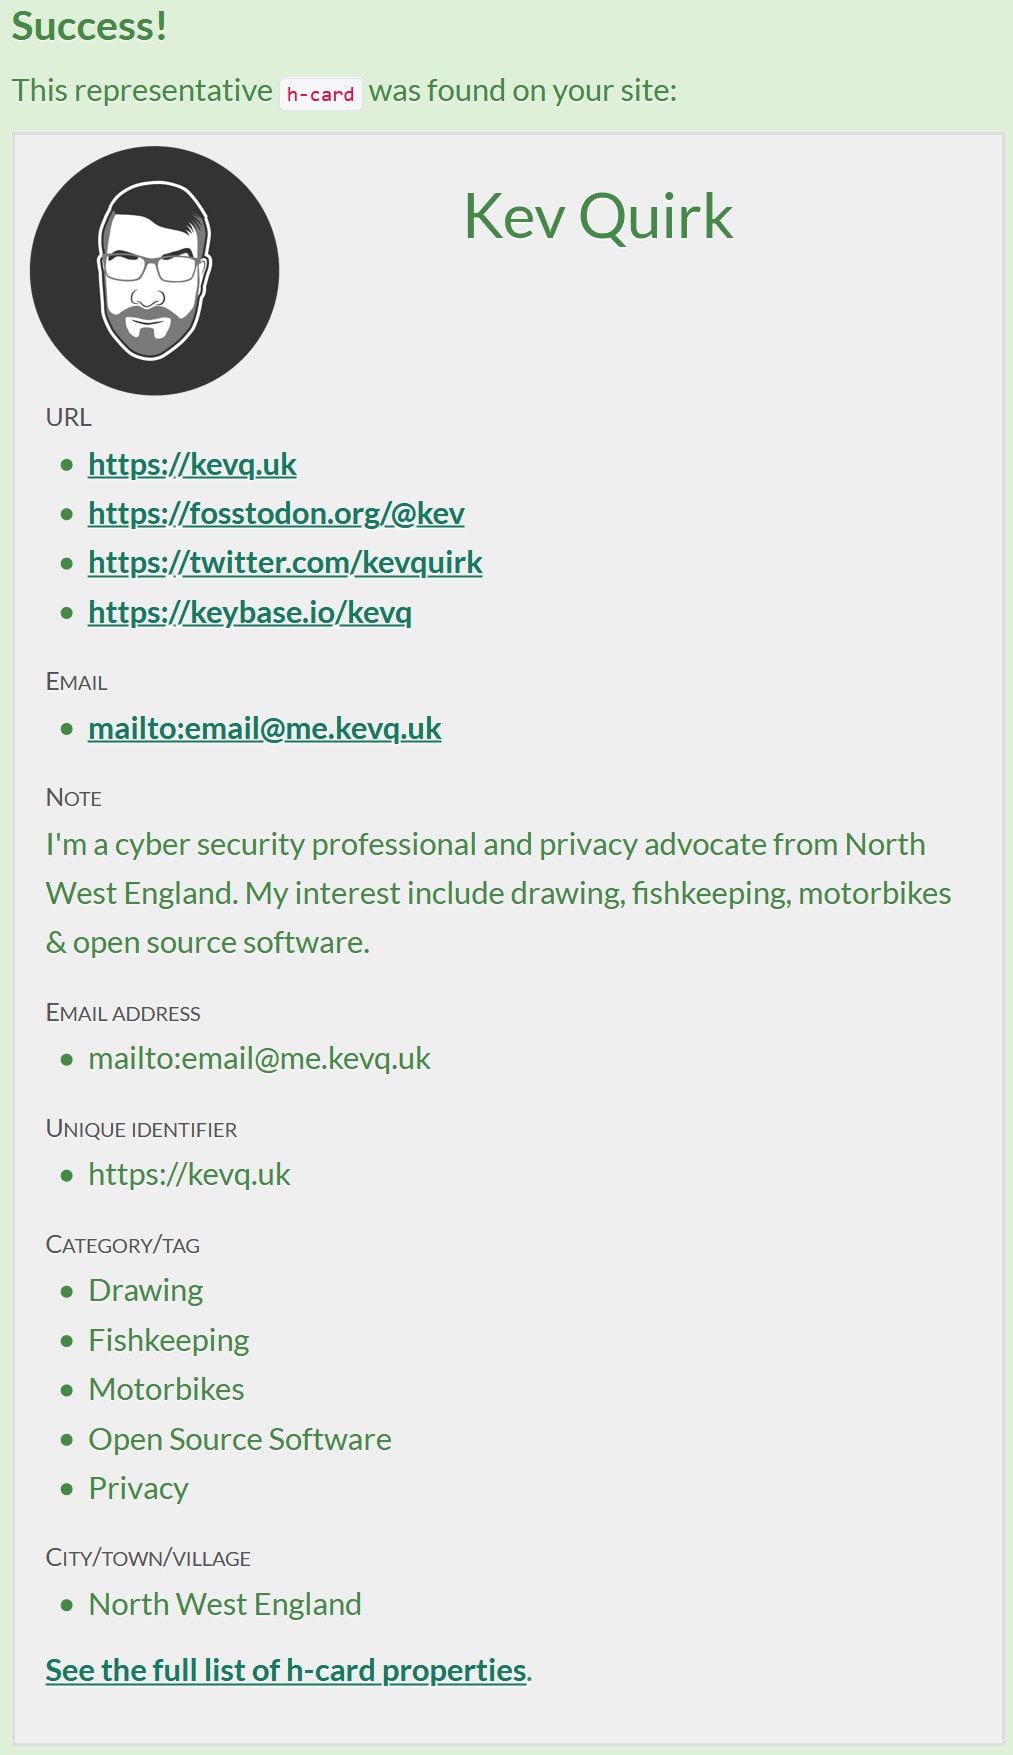
As you can see, my IndieWeb profile contains a fair amount of information. But there's a lot more you can add if you wish. This link lists all of the h-card identifiers that are available.
Enough of this preamble, let's get started and actually make the thing, shall we?
The Basics
There are a number of ways you can create a h-card. Some people like to markup their about page, others like to add the identifiers to their posts and pages. Personally, I opted to create a simple block of hidden code on my homepage that handles the whole thing.
I think this is the easiest way of doing it, as it then acts as a single profile within your website's code that is easy to update.
So with that we will start by creating a new HTML section what will house our h-card profile:
<section style="display: none;" class="h-card">

</section>
So display: none; tells your browser to hide everything within this section when the page is loaded. This ensures your visitors will not be able to see it, but other sites on the IndieWeb will traverse this code and find your profile. We're also giving the section a class of h-card, which tells the IndieWeb that this is your h-card profile.
About me
Now we have the basic section setup and we have hidden it with some inline CSS, let's add some basic information to the profile. My name and a short bio seems like a place to start:
<section style="display: none;" class="h-card">

<!-- About me -->
<span class="p-name">Kev Quirk</span>
<span class="p-note">I'm a cyber security professional and privacy advocate from North West England. My interest include drawing, fishkeeping, motorbikes & open source software.</span>

</section>
By using p-name and p-note as the class for the two lines of code, we're telling the IndieWeb what our name is and a little bit about ourselves.
Profile picture
No profile is complete without a profile picture. For this we simply add an img tag and set its class to u-photo:
<section style="display: none;" class="h-card">

<!-- About me -->
<span class="p-name">Kev Quirk</span>
<span class="p-note">I'm a cyber security professional and privacy advocate from North West England. My interest include drawing, fish keeping, motorbikes & open source software.</span>

<!-- Profile picture -->
<img class="u-photo" src="/_assets/images/400px-round-grey-glasses.png"/>

</section>
Location
Adding your location is totally optional, but I decided to add it as a lot of people assume I'm American. I'm not sure why, they just do, so I thought by adding my rough location this would help.
If you're going to do this, make sure the location you specify is very vague. I'd recommend Town/City at most.
<section style="display: none;" class="h-card">

<!-- About me -->
<span class="p-name">Kev Quirk</span>
<span class="p-note">I'm a cyber security professional and privacy advocate from North West England. My interest include drawing, fish keeping, motorbikes & open source software.</span>

<!-- Profile picture -->
<img class="u-photo" src="/_assets/images/400px-round-grey-glasses.png"/>

<!-- My location -->
<span class="p-locality">North West England</span>

</section>
Social Links
The next step is to add some links. These are really important as they show the IndieWeb what your other online identities are. This is a great way of validating your various online accounts so people know they're legitimate.
<section style="display: none;" class="h-card">

<!-- About me -->
<span class="p-name">Kev Quirk</span>
<span class="p-note">I'm a cyber security professional and privacy advocate from North West England. My interest include drawing, fish keeping, motorbikes & open source software.</span>

<!-- Profile picture -->
<img class="u-photo" src="/_assets/images/400px-round-grey-glasses.png"/>

<!-- My location -->
<span class="p-locality">North West England</span>

<!-- Links -->
<a class="u-url u-uid" href="https://kevq.uk"></a>
<a class="u-email" rel="me" href="mailto:kev@craves.coffee"></a>
<a class="u-url" rel="me" href="https://fosstodon.org/@kev"></a>
<a class="u-url" rel="me" href="https://keybase.io/kevq"></a>

</section>
The first link has two classes, u-url and u-uid. The u-url class is a generic identifier that simply says that this URL is owned by me. So this could be a social profile, or a link to your homepage.
u-uid is a little different. This is your universally unique identifier, so it's the daddy of all your links - it's your main home on the IndieWeb. A link to your homepage should always include both the u-url and u-uid classes.
We then have u-email which is pretty self-explanatory - it's your email address. I personally use the same email address as the one listed on my contact page for this.
Finally we have a few links to my social profiles that only contain the u-url identifier.
Categories
Adding categories to your IndieWeb profile shows other people on the IndieWeb the kind of things you're interested in and write about on your blog.
<section style="display: none;" class="h-card">

<!-- About me -->
<span class="p-name">Kev Quirk</span>
<span class="p-note">I'm a cyber security professional and privacy advocate from North West England. My interest include drawing, fish keeping, motorbikes & open source software.</span>

<!-- Profile picture -->
<img class="u-photo" src="/_assets/images/400px-round-grey-glasses.png"/>

<!-- My location -->
<span class="p-locality">North West England</span>

<!-- Links -->
<a class="u-url u-uid" href="https://kevq.uk"></a>
<a class="u-email" rel="me" href="mailto:kev@craves.coffee"></a>
<a class="u-url" rel="me" href="https://fosstodon.org/@kev"></a>
<a class="u-url" rel="me" href="https://keybase.io/kevq"></a>

<!-- Categories -->
<span class="p-category">Blogging</span>
<span class="p-category">Fish keeping</span>
<span class="p-category">InfoSec</span>
<span class="p-category">Motorbikes</span>
<span class="p-category">Open Source Software</span>
<span class="p-category">Privacy</span>
<span class="p-category">Web Design</span>

</section>
Adding more items
That's pretty much it for my h-card, but I mentioned earlier in this post that you can add other items to your profile if you would like. A full list of all supported identifiers can be found here.
For example, let's say I want to add my title, which is Mr. The additional code to be added to my h-card would look like this:
<!-- My title -->
<span class="p-honorific-prefix">Mr</span>
If you want to add others, just follow this same process, referencing the specific identifier for the field you wish to add.
Note: Wherever I've added <!-- XXXX --> throughout my h-card is optional. These are just HTML comments that make reading the code easier for me.
Adding it to your website
All you need to do now is copy and paste the complete h-card somewhere inside your <body> tags on your website's homepage. Personally, I would recommend putting your h-card right at the bottom, just above your closing </body> tag. This way it won't interfere with anything else on your page.
Once you have added your h-card to your site's code, save it and uploaded it to your web server and you should have a working IndieWeb profile. If you want to test your profile to see if it's working, you can use this page.
Do you have a different way of managing your IndieWeb h-card? If so, why not tell me how you have done it in the comments below.
Subscribe for more!
You don't have to keep coming back here to read my latest waffle. There's a couple of ways to subscribe to receive updates whenever I publish new content.